
- Pine Script: A Robust Language for TradingView Strategies and Indicators
- Why Pine script? | Pine Script Guide Systematic Trading
- Why shouldn’t I use Pine script? | Pine Script Guide Systematic Trading
- What Options Exist Instead of Utilizing Pine Script?
- How to Begin Your Journey with Pine Script?
- An Initial Glimpse into Pine Editor | Pine Script Guide Systematic Trading
- How to Obtain the Microsoft Stock Price?
- How to Obtain the SMA(20) of Microsoft (MSFT)?
- How can I perform a backtest on a moving average crossover strategy using Pine Script?
- How can you establish take-profit and stop-loss levels?
- How to trigger a trade for Apple when Google's price moves by 5%?
- How can we make modifications to our scripts without the need for manual coding?
- How to create plots using Pine Script? | Pine Script Guide Systematic Trading
- Visualizing Forex market hours through plotting | Pine Script Guide Systematic Trading
- Creating annotations through plotting | Pine Script Guide Systematic Trading
- How can I develop a personalized indicator using Pine Script?
- Closing Remarks
Pine Script Guide Systematic Trading
Pine Script: A Robust Language for TradingView Strategies and Indicators
Pine Script, an ingenious programming language devised by TradingView, serves as a powerhouse for both backtesting trading strategies and crafting custom indicators.
Engineered with efficiency in mind, Pine Script often enables you to attain your goals with fewer lines of code in comparison to alternative programming languages.
Although Pine Script is language-agnostic, individuals familiar with Python will find themselves quickly adapting, thanks to discernible similarities.
For your convenience, Pine Script code can be effortlessly generated within the Pine Editor, seamlessly integrated into TradingView’s online charting platform.
Link: https://www.tradingview.com/pine-script-docs/en/v5/Introduction.html
Why Pine script? | Pine Script Guide Systematic Trading
- Built-in Data Convenience: One compelling reason to embrace Pine Script is its seamless access to built-in data. Unlike other languages, where you must hunt for your data source and meticulously format it, TradingView offers a treasure trove of readily available data. With just one line of code, you can tap into this wealth of information, saving you valuable time and effort.
- User-Friendly Learning Curve: Pine Script boasts a user-friendly syntax that’s both readable and simpler compared to many programming languages. Plus, you’ll find yourself sparing less time on error checking and handling, as TradingView handles a substantial part of that for you, making the learning process smoother.
- Rich User Community and Library: TradingView’s vast user base offers a significant advantage. Users can effortlessly share their indicators and strategies on the TradingView library. Access to open-source code provides an excellent opportunity to learn from fellow programmers. Moreover, in certain instances, you may discover that someone else has already crafted the code you need, expediting your development process.
Why shouldn’t I use Pine script? | Pine Script Guide Systematic Trading
Pine Script undeniably shines in many aspects, but it’s not without its limitations. Here’s why you might want to explore other options:
- TradingView Universe Boundaries: The primary constraint of Pine Script is its confinement within the TradingView ecosystem. While TradingView offers an extensive array of data feeds, your trading ambitions could hit a wall if your desired data falls outside its reach. For instance, if you’re venturing into niche markets, accessing price data might prove challenging.
- Beyond Price Data: Certain strategies necessitate the use of economic or statistical data, which might not be readily available on TradingView. While there is some support for such data, particularly Quandl data, it remains limited in scope. If your strategy heavily relies on alternative data sources, opting for another programming language could offer greater flexibility and versatility.
- External Libraries and Advanced Functions: Pine Script may not align with your goals if your strategy involves leveraging external libraries or advanced functions like machine learning. For more intricate data science or third-party library requirements, there are alternative programming languages better suited to your needs.
In such scenarios, exploring alternative programming languages can open up a world of possibilities beyond Pine Script’s confines.
What Options Exist Instead of Utilizing Pine Script?
- TD Ameritrade’s thinkorswim: If you’re in search of Pine Script alternatives, consider TD Ameritrade’s thinkorswim platform. It boasts remarkable similarities to Pine Script, employing its proprietary language known as thinkScript. Much like Pine Script, thinkScript effectively manages price data using arrays. This platform provides built-in data and is ideally suited for crafting bespoke indicators and strategies.
- NinjaTrader: Another compelling option is NinjaTrader, which utilizes its proprietary language called Ninjascript. While Ninjascript is proprietary, it is firmly rooted in C#. NinjaTrader offers enhanced flexibility by facilitating connections to custom data feeds. If you possess prior experience with C#, C, or C++, this platform may serve as a viable Pine Script alternative.
- TradeStation and MultiCharts: Furthermore, you can delve into TradeStation and MultiCharts as SEO-optimized alternatives to Pine Script. TradeStation offers its scripting language, EasyLanguage, while MultiCharts provides an expansive environment for strategy development and customization. Both platforms cater to traders seeking versatile tools that go beyond the capabilities of Pine Script.
How to Begin Your Journey with Pine Script?
Starting with Pine Script couldn’t be easier – there’s no need for downloads or installations.
For those who already possess a TradingView account, just visit their website.
If you’re new to TradingView, go to www.tradingview.com. You’ll find a sign-in box in the top right corner (“Get Started”)

Registering is a breeze, with convenient one-click sign-up options or the traditional email/password method available.
Creating an account offers the benefit of saving your scripts to the TradingView cloud and enables you to incorporate custom indicators into your charts.
Once you’ve registered, you can initiate the charting platform by either clicking on “Chart” in the menu or by visiting www.tradingview.com/chart.
An Initial Glimpse into Pine Editor | Pine Script Guide Systematic Trading
Pine Editor is your coding workspace. To access it, simply click on “Pine Editor” located at the very bottom of your screen.
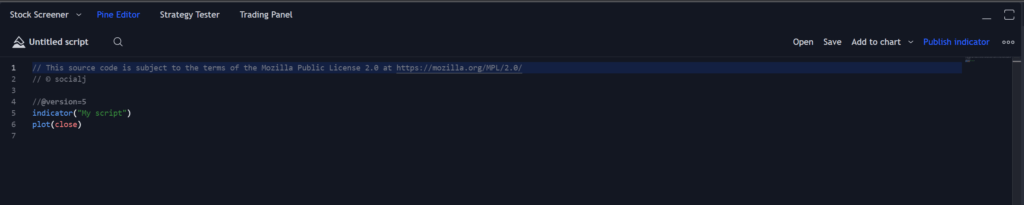
In Pine Script, your focus will be on crafting either an “indicator” or a “strategy.” The distinctions between these two will be thoroughly explored in this article.
If you’re following along, the screen currently displayed is the default script for initiating the creation of an indicator.
Let’s delve into it, examining each line step by step.
// This source code is subject to the terms of the Mozilla Public License 2.0 at https://mozilla.org/MPL/2.0/The initial line serves as a comment. In Pine Script, comments are initiated with two forward slashes (//).
// © authorThe second line, too, is a comment. It is automatically filled with your TradingView username.
//@version=5Moving to the fourth line, it might appear to be another comment, but there’s a unique twist.
This line is a compiler directive, serving the purpose of informing the compiler about the specific Pine Script version we intend to utilize.
While you can omit the initial two comment lines if you wish, it’s crucial to include the compiler directive in all scripts.
indicator("My Script")Line 5 signifies a declaration phase. This is where you explicitly indicate whether you intend to develop an indicator.
Alternatively, you can opt to create a strategy, but for now, we’ll commence with crafting an indicator.
The latter part of Line 5, enclosed within quotation marks, represents the name you will assign to this specific indicator. By default, it’s set as “My Script.”
plot(close)Line 6 encompasses the plot command, serving as an instruction to TradingView to graph a particular variable.
In this instance, we’re instructing the platform to plot the variable “close.” This variable is inherently embedded with the closing price of the most recent bar.
Now, proceed by selecting “Add to Chart” located in the upper right corner of the Pine Editor.
You will be prompted to save the script.
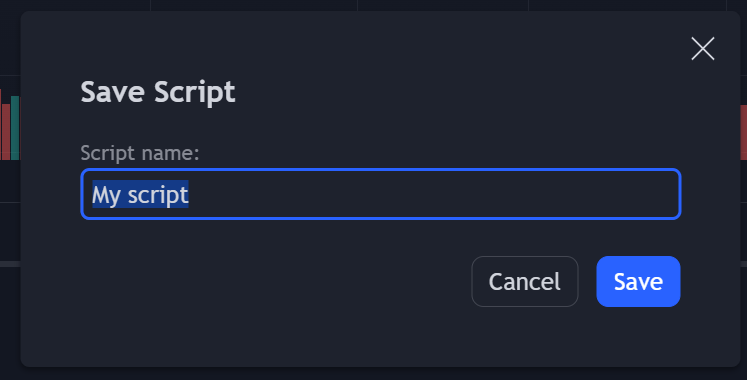
Once saved, your chart should have a new window that contains a plot of the closing prices from your main chart.
This specific window is referred to as the data window. In the illustration above, it’s represented as the blue line chart.
Take notice that the data window prominently displays “My Script” in the upper left-hand corner. This label is derived from Line 5 of our code, where we specified the name for our indicator.
And just like that, we’ve created our initial indicator without the need for any manual code entry!
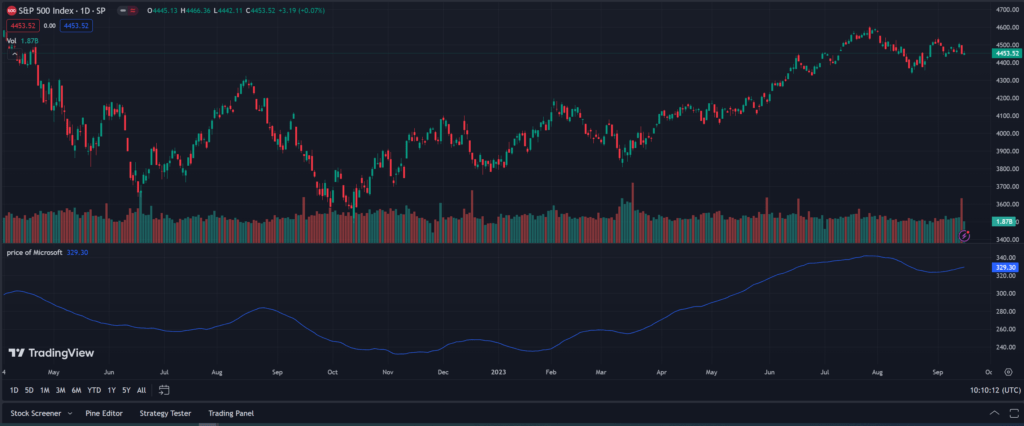
How to Obtain the Microsoft Stock Price?
In our initial demonstration, we charted the closing price, and Pine Script handles this automatically for the currently open chart.
In this case, we had a daily chart of the SP500 index.
However, suppose you wish to retrieve data for a different asset, such as Microsoft, even when you don’t have its chart open. Let’s illustrate this scenario by fetching Microsoft’s price.
Each script commences with a set of introductory lines. These lines define the compiler directive, specify whether it’s an indicator or strategy in development, and assign a distinctive name.
//@version=5
indicator("price of Miscrosoft")
In this scenario, we are developing an indicator named “Microsoft Stock Price.”
Now, we need to inform Pine Script that our focus is on a different asset than the one currently visible on the chart.
To accomplish this, we’ll employ the request.security() function.
request.security()A nice feature of Pine script is that help is always easily available if you’re working with the syntax you haven’t worked with before.
For example, we can hover over our function and it will show a brief description.
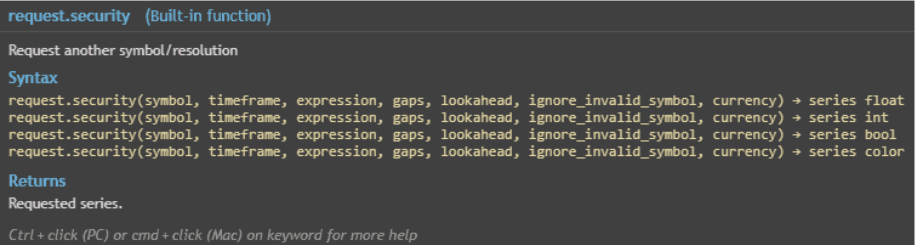
For more detailed information, you can launch a help window. To do this, hit CTRL while clicking on the function on a PC. Or, on a Mac, press CMD while clicking on the function.
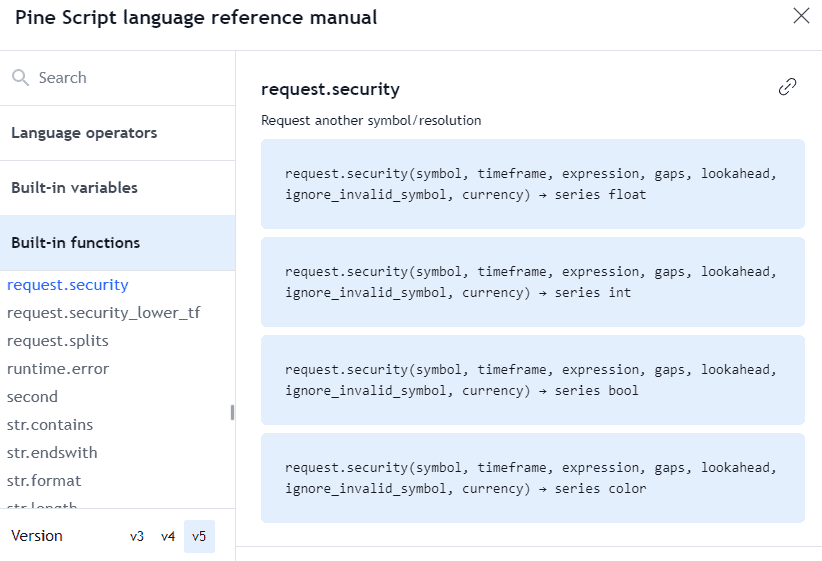
The assistance function provides clarity on the syntax and includes useful illustrative examples.
request.security("MSFT", "D", close)
We’ve utilized syntax resembling the example from the code snippet above. The first parameter within the security function corresponds to the ticker symbol, which, in this instance, is MSFT.
Subsequently, we’ve specified the daily time frame, and lastly, we’ve informed Pine Script of our interest in the closing price.
We retain the flexibility to store the function’s result in a variable.
microsoft_price = request.security("MSFT", "D", close)Now the Microsoft price variable will contain the latest daily close of Microsoft’s stock.
Studies created in Pine script need to have at least one output, otherwise, the script will generate a compiler error.
Let’s plot our variable so that it satisfies the Pine script rule about having an output.
plot(microsoft_price)After saving and adding to the chart, this is what our screen looks like.

We now have Microsof’s daily closing price plotted in the data window while the main window is showing a candlestick chart of SP500 index.
Full Code:
//@version=5
indicator("price of Microsoft")

microsoft_price = request.security("MSFT", "D", close)

plot(microsoft_price)
How to Obtain the SMA(20) of Microsoft (MSFT)?
Pine Script Guide Systematic Trading
Now that we can access Microsoft’s stock price, let’s illustrate an example of fetching a simple moving average (SMA).
This identical process can be employed for the application of any indicator.
We’ll commence with our fundamental declarations and utilize the security function established in our previous illustration.
//@version=5
indicator("Get 20 SMA of Microsoft")

// Get price of Microsoft
microsoft_price = request.security("MSFT", "D", close) // 1 Day
If you’re not specifically seeking the 20 SMA for Microsoft, you can bypass the security definition and directly utilize the native “close” variable.
This method will retrieve the closing price for the security currently displayed in your primary chart window.
Pine Script incorporates a convenient helper function for the SMA indicator. To access it, we can readily employ the “ta.sma()” function.
ta.sma(microsoft_price, 20)
The initial parameter to provide is the price data source. In this instance, we are utilizing the closing price for MSFT, which we’ve stored in our “microsoft_price” variable.
The second parameter signifies the length of the SMA, where we are seeking a 20-period SMA.
Finally, we will allocate the SMA data to a distinct variable and subsequently depict it on the chart.
microsoft_sma = ta.sma(microsoft_price, 20)

plot(microsoft_sma)
The simple moving average for Microsoft is now displayed on our data window.
Moving averages are typically plotted on the main chart. We can achieve that with a slight modification in our code.
indicator("Get 20 SMA of Microsoft", overlay=true)By adding in overlay=True into the indicator declaration, we can plot our data directly into the main charting window as opposed to the data window.
Full Code:
//@version=5
indicator("Get 20 SMA of Microsoft", overlay=true)

// Get price of Microsoft
microsoft_price = request.security("MSFT", "D", close) // 1 Day

// Calculate 20 SMA of Microsoft
microsoft_sma = ta.sma(microsoft_price, 20)

plot(microsoft_sma)
How can I perform a backtest on a moving average crossover strategy using Pine Script?
Pine Script Guide Systematic Trading
We’ve covered indicators. Now, let’s delve into strategies using Pine Script.
In the upcoming example, we’ll develop a moving average crossover strategy, incorporating a set of extra parameters. Afterward, we’ll conduct a backtest of this strategy within TradingView.
//@version=5
strategy("My Strategy", overlay=true)
To create a strategy, we swap out the indicator declaration with a strategy declaration.
// Create Indicator's
shortSMA = ta.sma(close, 10)
longSMA = ta.sma(close, 30)
Our initial step will involve the creation of two moving averages and the assignment of data to variables.
rsi = ta.rsi(close, 14)Additionally, we’ll generate an RSI indicator to validate our entry and exit points.
Since we intend to execute this strategy on the primary chart, we won’t require the use of the security() function in this context.
Our next task is to define our crossover conditions. Fortunately, TradingView provides a built-in function for this purpose, eliminating the need for manual coding.
// Specify crossover conditions
longCondition = ta.crossover(shortSMA, longSMA)
shortCondition = ta.crossunder(shortSMA, longSMA)
We have two conditions to consider. The first condition triggers when the short 10-period SMA crosses above the longer 30-period SMA.
The second condition is the reverse, as we’ve employed the “crossunder” function instead of “crossover.”
Both of these conditions are stored in variables. Therefore, when a crossover or crossunder takes place, these variables will be updated to “True,” which is a Boolean value.
To act upon these conditions, we can employ an if statement to check if the condition has indeed changed to “True,” and then execute a trade accordingly.
if (longCondition)
    strategy.entry("long", strategy.long, 100, when = rsi > 50)
The built-in function “strategy.entry” is utilized for entering trades. It accepts the following parameters:
- “long” – This represents a trade ID. Although we won’t be using it in this example, it can be handy for closing or canceling trades.
- “strategy.long” – This is a predefined variable in Pine Script indicating our intention to go long (i.e., initiate a buy position).
- 100 – This is the quantity of shares we aim to trade.
- “when = rsi > 50” – This serves as an additional parameter, instructing Pine Script to execute the trade only when the RSI is greater than 50.
The syntax for our short entries will closely mirror this format.
if (shortCondition)
    strategy.entry("short", strategy.short, 100, when = rsi < 50)
Because we are executing a strategy, there is no requirement to plot anything or specify an output.
Nevertheless, we will proceed with these actions. It is beneficial to visualize the SMAs on the chart, allowing us to verify that trades were executed as intended.
// Plot Moving Average's to chart
plot(shortSMA)
plot(longSMA, color=color.black)
If we save and add the strategy to the chart, it will initiate and automatically open the “Strategy Tester” window, where crucial statistics will be presented.
Here’s what the screen appears like:
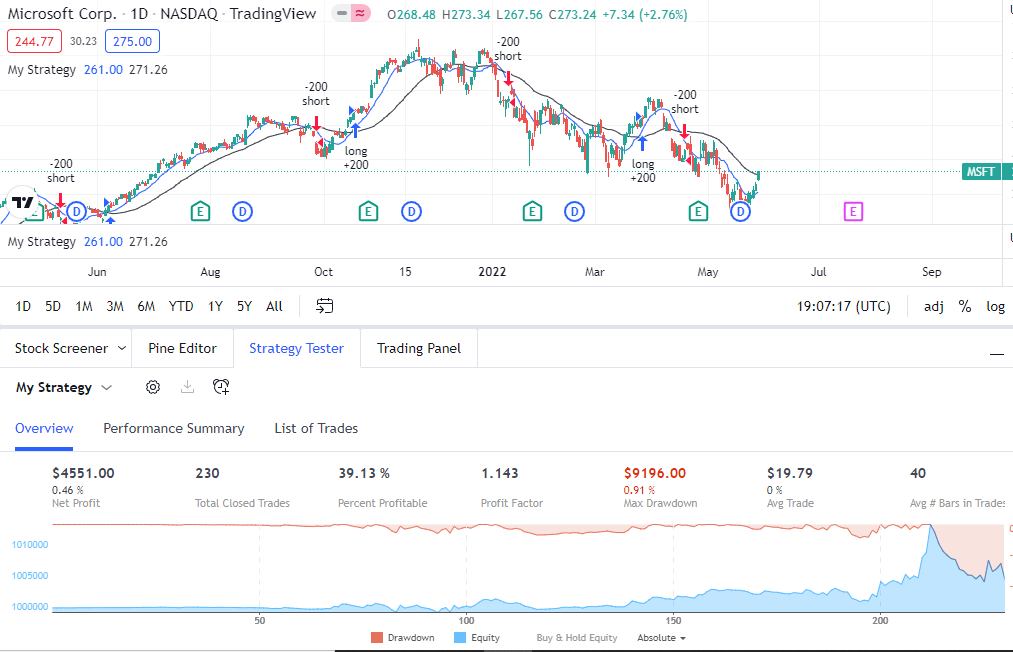
By default, a new tab opens, displaying an overview of the strategy’s statistics. You can navigate to the “Performance Summary” or “List of Trades” tabs to access other important data.
The strategy will operate on the time frame visible on your chart. To switch between various time frames, you can conveniently use the time frame options located in the menu at the top of the screen. The strategy will automatically adjust based on the newly selected time frame.
Full Code:
//@version=5
strategy("My Strategy", overlay=true)

// Create Indicator's
shortSMA = ta.sma(close, 10)
longSMA = ta.sma(close, 30)
rsi = ta.rsi(close, 14)

// Specify crossover conditions
longCondition = ta.crossover(shortSMA, longSMA)
shortCondition = ta.crossunder(shortSMA, longSMA)

// Execute trade if condition is True
if (longCondition)
    strategy.entry("long", strategy.long, 100, when = rsi > 50)

if (shortCondition)
    strategy.entry("short", strategy.short, 100, when = rsi < 50)

// Plot Moving Average's to chart
plot(shortSMA)
plot(longSMA, color=color.black)
How can you establish take-profit and stop-loss levels?
Pine Script Guide Systematic Trading
In our previous example, trade execution was driven by moving average crossovers and crossunders.
In the current script, we will enhance it by implementing precise stop-loss and take-profit levels. To achieve this, we will employ the Average True Range (ATR) indicator for calculations.
The ATR indicator computes the average price movement over a defined number of recent bars, providing a reliable method to factor in fluctuations in market volatility.
While we’ve already defined several indicators, we will now include the ATR indicator in our list.
// Create Indicator's
shortSMA = ta.sma(close, 10)
longSMA = ta.sma(close, 30)
rsi = ta.rsi(close, 14)
atr = ta.atr(14)
Under our trade conditions, we can make the necessary calculations for our stop loss and take profit.
if (longCondition)
    stopLoss = low - atr * 2
    takeProfit = high + atr * 2
    strategy.entry("long", strategy.long, 100, when = rsi > 50)
    strategy.exit("exit", "long", stop=stopLoss, limit=takeProfit)
In the code snippet above, we determined the stop-loss by taking the low of the bar at the entry time and subtracting twice the Average True Range (ATR).
For example, if the stock typically moves $5 per bar on average, we are placing our take-profit $10 below the low.
A parallel calculation is performed for setting the take-profit.
Lastly, we define the exit condition using the “strategy.exit()” function, passing these parameters:
- “exit” – This represents the trade ID for exiting the trade.
- “long” – This is the ID we previously set when entering the trade. It informs Pine Script which position we intend to exit.
- “stop = stopLoss” – This specifies that the level contained in the “stopLoss” variable should be used as a stop order to exit the trade.
- “limit = takeProfit” – We specify that the level contained in the “takeProfit” variable should serve as a limit order to exit the trade.
The syntax for our short condition closely follows this structure, although some calculations may vary slightly.
if (shortCondition)
    stopLoss = high + atr * 2
    takeProfit = low - atr * 2
    strategy.entry("short", strategy.short, 100, when = rsi < 50)
    strategy.exit("exit", "short", stop=stopLoss, limit=takeProfit)
The rest of the script remains unchanged from the prior example. Let’s run it and see how our strategy did.
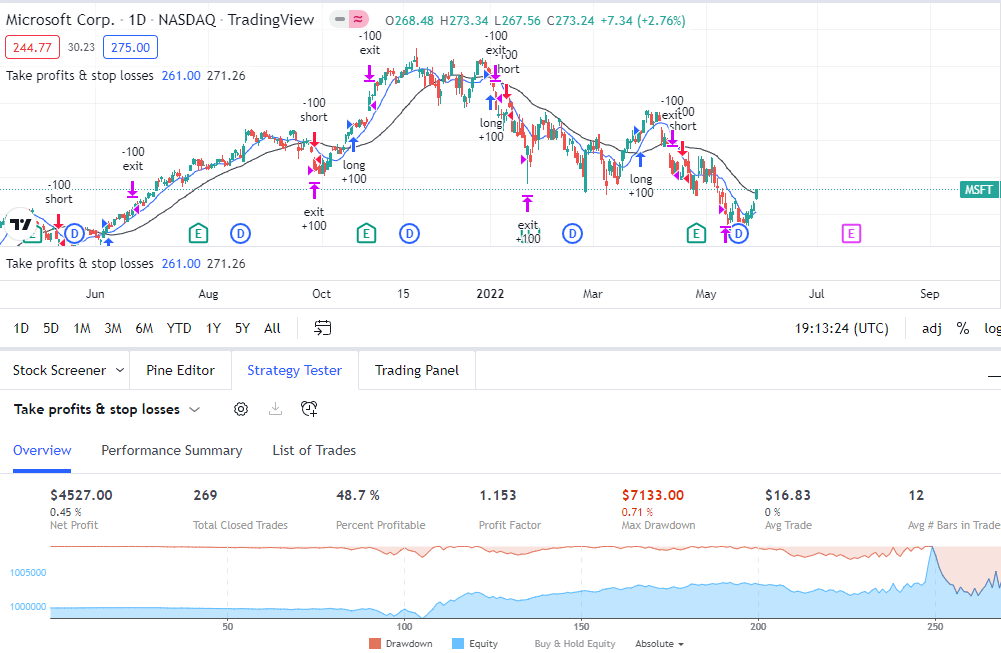
Our exits are working and being plotted on our main chart along with the long and short entries.
Full Code:
//@version=5
strategy("Take profits & stop losses", overlay=true)

// Create Indicator's
shortSMA = ta.sma(close, 10)
longSMA = ta.sma(close, 30)
rsi = ta.rsi(close, 14)
atr = ta.atr(14)

// Specify crossover conditions
longCondition = ta.crossover(shortSMA, longSMA)
shortCondition = ta.crossunder(shortSMA, longSMA)

// Execute trade if condition is True
if (longCondition)
    stopLoss = low - atr * 2
    takeProfit = high + atr * 2
    strategy.entry("long", strategy.long, 100, when = rsi > 50)
    strategy.exit("exit", "long", stop=stopLoss, limit=takeProfit)

if (shortCondition)
    stopLoss = high + atr * 2
    takeProfit = low - atr * 2
    strategy.entry("short", strategy.short, 100, when = rsi < 50)
    strategy.exit("exit", "short", stop=stopLoss, limit=takeProfit)

// Plot Moving Average's to chart
plot(shortSMA)
plot(longSMA, color=color.black)
How to trigger a trade for Apple when Google’s price moves by 5%?
Pine Script Guide Systematic Trading
We’ve observed that the “security” function can be employed to access data for stocks not currently visible on the screen.
We will harness this function to formulate a strategy that triggers a trade in Apple when Google experiences a price change exceeding 5%.
This strategy operates as a mean reversion approach. In the event that Google’s price surges by more than 5%, we will initiate a short position in Apple. Conversely, if Google’s price declines by more than 5%, we will consider buying Apple.
Our initial step involves storing the daily opening and closing prices of Google into a variable.
//@version=5
strategy("Pair Trade: Apple & Google")

google_close = request.security("GOOG", "D", close)
google_open = request.security("GOOG", "D", open)
We can then perform a calculation to determine the percentage price change.
price_change = google_close / google_openThe “price_change” variable now contains the computed value. For instance, if Google started at $100 and surged by 5% to close at $105, the “price_change” variable would be 105/100, which equals 1.05.
On the other hand, if Google commenced at $100 and declined by 5% to close at $95, the variable would be 95/100, resulting in 0.95.
Therefore, if we detect that Google has decreased by 5% or more, the “price_change” variable will be 0.95 or lower, indicating our intention to go long. Here’s the syntax to implement this logic.
if price_change < 0.95
    strategy.entry("long", strategy.long, 100)
And the syntax to get short if Google rallies more than 5%.
if price_change > 1.05
    strategy.entry("short", strategy.short, 100)
You might observe that we haven’t explicitly referenced Apple’s stock price in the code. When you open an AAPL (Apple) chart, the script will inherently recognize that it should execute trades in Apple.
To conclude, we will plot the “price_change” variable in the data window. While not essential, it provides a visual representation and allows us to verify that the trades are executing as intended.
plot(price_change)And here are the results of our strategy.
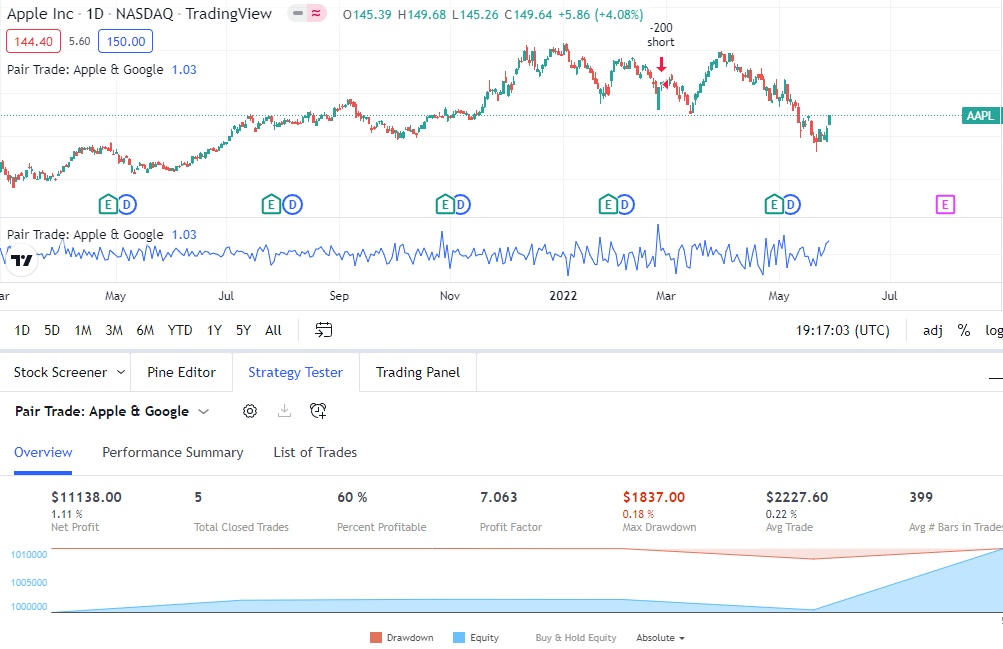
Only four trades as 5% movements are rare. We’d probably need to see a lot more trades than that to determine if it’s a good strategy.
It did seem to have done a good job picking out that low in March!
Full Code:
//@version=5
strategy("Pair Trade: Apple & Google")

google_close = request.security("GOOG", "D", close)
google_open = request.security("GOOG", "D", open)

price_change = google_close / google_open

if price_change < 0.95
    strategy.entry("long", strategy.long, 100)

if price_change > 1.05
    strategy.entry("short", strategy.short, 100)

plot(price_change)
How can we make modifications to our scripts without the need for manual coding?
Pine Script Guide Systematic Trading
A cool feature of Pine script is that we can create custom inputs to easily change the parameters of our strategies and indicators.
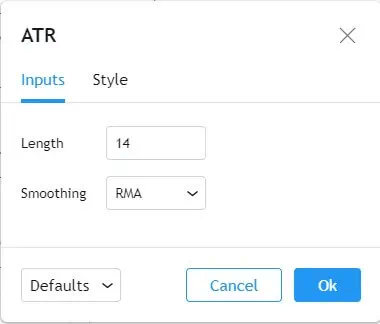
Inspect the standard ATR (Average True Range) indicator provided in TradingView. Observe how straightforward it is to adjust parameters like length and colors through the Style tab.
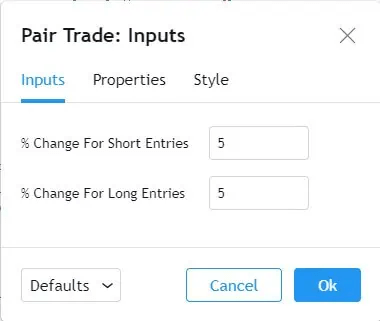
We can replicate this flexibility for the studies and strategies developed in Pine Script by utilizing the “input()” function. Here’s an example of how the “input” function can enable users to customize the percentage change in accordance with the previous strategy example.
longTrigger = input(title="% Change for short entries", defval=5)

shortTrigger = input(title="% Change for long entries", defval=5)
Let’s review the parameters passed into the “input()” function:
- “title” – This is where we define the text that the user will see when attempting to adjust the value of that specific parameter.
- “defval” – This represents the default value.
Now, we can obtain values from the user. However, users will input values in the form of percentages, such as 5%. We must convert these percentages to decimals (e.g., 5% to 1.05) to use them in our conditional statements.
longTrigger := 1 - longTrigger/100
shortTrigger := 1 + shortTrigger/100
And we need to change our if statements to look at our newly created variables based on user input rather than the previously hard-coded values.
if price_change < longTrigger
    strategy.entry("long", strategy.long, 100)

if price_change > shortTrigger
    strategy.entry("short", strategy.short, 100)
To access the input settings, click on the gear icon located beside the name of your strategy in the data window.

Custom values can now be set for the percentage change used in the strategy.
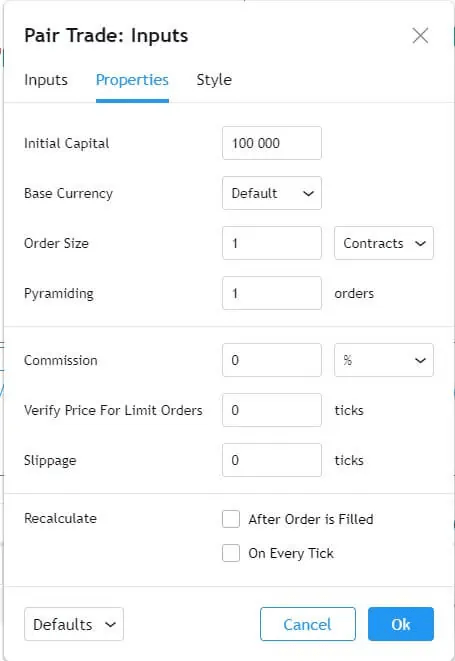
There is also a Properties window that will allow you to set custom options for other parts of the strategy.
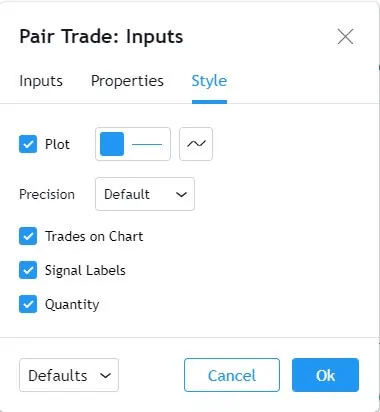
And a Style window to customize plotting options.
Full Code:
//@version=5
strategy("Pair Trade: Inputs")

longTrigger = input(title="% Change for short entries", defval=5)
shortTrigger = input(title="% Change for long entries", defval=5)

longTrigger := 1 - longTrigger/100
shortTrigger := 1 + shortTrigger/100

google_close = request.security("GOOG", "D", close)
google_open = request.security("GOOG", "D", open)

price_change = google_close / google_open

if price_change < longTrigger
    strategy.entry("long", strategy.long, 100)

if price_change > shortTrigger
    strategy.entry("short", strategy.short, 100)

plot(price_change)
How to create plots using Pine Script? | Pine Script Guide Systematic Trading
Pine Script Guide Systematic Trading
Up until now, we’ve utilized the standard “plot()” function to visualize specific data on the screen. Pine Script offers a variety of other commands for generating output, and we will explore a selection of them.
Visualizing Forex market hours through plotting | Pine Script Guide Systematic Trading
Pine Script Guide Systematic Trading
Being aware of market opening and closing times is crucial for Forex traders, but it can be challenging to keep track of. Forex operates 24 hours a day, five days a week, with various global markets opening and closing, influencing currency volatility.
To simplify this, let’s develop an indicator that provides a quick visual reference on the chart to identify the busiest market hours. Typically, Forex traders focus on the London and New York sessions. We will begin by defining the times for these sessions.
//@version=5
indicator("Forex Sessions", overlay=true)

London = time(timeframe.period, "0700-1500")
NY = time(timeframe.period, "1200-2000")
Here, we’ve utilized the “time()” function to define a specific time frame. Within the parameters, we’ve designated “0700 UTC” as the commencement time for the London session and “1500 UTC” as its conclusion.
The “London” variable will subsequently capture the timestamp of a bar if it falls within this designated interval. Otherwise, it will indicate “NaN” (signifying no value).
To assess the “London” variable’s output, we can implement an if statement.
val = if (na(London))
    1
else
    0
In the provided code snippet, we employ a built-in function called “na()”. This function assesses whether a variable holds a NaN value or not.
If the “London” variable yields NaN, it indicates that the bar falls outside of London trading hours. In such a case, a variable named “val” is assigned the value of 1. Conversely, if the “London” variable does not return NaN, the “val” variable is set to 0.
To conclude, we visualize the newly created “val” variable through plotting.
plot(val)Here is what our chart looks like after saving and adding this indicator to the chart.
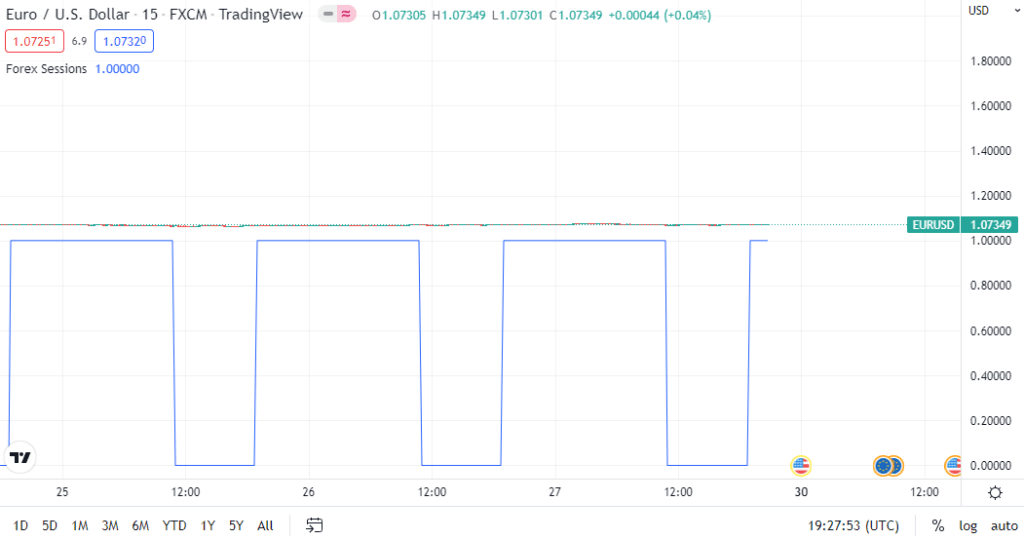
The current presentation is not very clear. While it accurately reflects the London market’s opening hours, plotting these values has made our candlestick chart difficult to interpret.
One option is to display this information in the data window, which would improve the visibility of the candlesticks. However, it still wouldn’t provide a clear visual representation of market open and close times.
Additionally, the code itself could benefit from some improvements. To enhance readability, let’s begin by using a concise one-line if statement.
na(London) ? 1 : 0This code performs the same function as the if statement before. We don’t need to use the valvariable in this case. Let’s break down the syntax.
na(London)This part is checking to see if the Londonvariable contains a NaN value.
? 1 : 0
The question mark used here is a condensed representation of an if/else statement. What comes after the question mark is the key element. It consists of two numbers separated by a colon. The number preceding the colon, which is 1 in this instance, is what will be returned if the if statement evaluates to true. The number following the colon, which is 0 in this case, is what gets returned when the if statement is false.
We can streamline this entire syntax by enclosing it within a plot function, eliminating the need to first store it in a variable.
plot(na(London) ? 1 : 0)With the one-line code enhancement, we’ve streamlined the if statement.
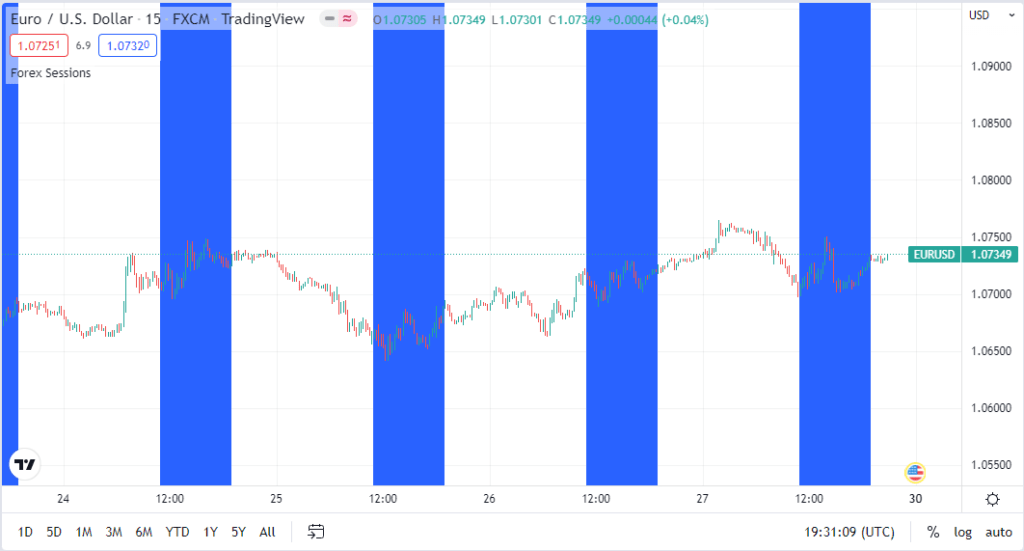
To enhance chart readability, we can modify the background color when the London market is open. To achieve this, we replace the “plot()” function with the “bgcolor()” function, which grants us the capability to alter the background color.
bgcolor(na(London) ? 1 : 0)Also, we will specify a color for when the market is open.
bgcolor(na(London) ? na : color.blue)Our chart is starting to look a lot better!
The last thing we will do is add code to see if the New York market is open, and set the background to green if it is.
bgcolor(na(NY) ? na : color.green)You’ll notice that there are three colors on the chart below.
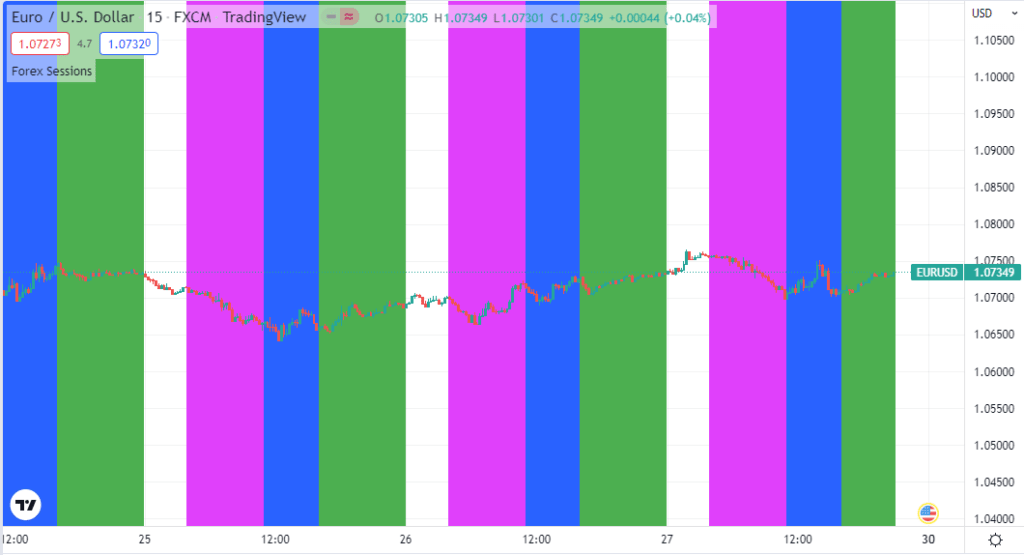
This overlap occurs because the London and New York sessions coincide, making it typically the most volatile period of the day.
Now, we have a clear visual representation of these trading sessions, allowing us to swiftly identify details such as the highs observed during European trading or the lows recorded during the overlap.
Full Code:
//@version=5
indicator("Forex Sessions", overlay=true)

Tokyo = time(timeframe.period, "0000-0800")
London = time(timeframe.period, "0700-1500")
NY = time(timeframe.period, "1200-2000")

bgcolor(na(Tokyo) ? na : color.fuchsia)
bgcolor(na(London) ? na : color.blue)
bgcolor(na(NY) ? na : color.green)
Creating annotations through plotting | Pine Script Guide Systematic Trading
Pine Script Guide Systematic Trading
There are multiple methods for adding annotations. For instance, you can employ the “hline()” function to draw a horizontal line across the chart.
Another option is the “plotchar()” function, which permits you to display ASCII characters on your chart. This is frequently used to annotate notes either above or below the price bar.
Additionally, the “plotshape()” function is widely used for plotting various shapes. It’s particularly popular for displaying arrows at the top or bottom of bars to indicate buy or sell signals.
For a complete list of the various annotations available, check out the Annotations overview in the Pine script user manual.
How can I develop a personalized indicator using Pine Script?
Pine Script Guide Systematic Trading
We will be constructing a multi-timeframe indicator.
This indicator is founded on a scalping strategy that I employed when I first ventured into trading. It revolves around a mean reversion strategy that tends to perform well during the early Asian session in the Forex markets, characterized by relatively subdued activity.
The core of the strategy entails the utilization of Bollinger Bands on a 5-minute chart and the RSI on a 1-minute chart.
The primary concept is to identify RSI divergence on a 1-minute chart when the price reaches either the upper or lower Bollinger Bands on a 5-minute chart.
Potential exit points include targeting the midline of the 5-minute Bollinger Bands or the lower boundary of a 1-minute Bollinger Band.
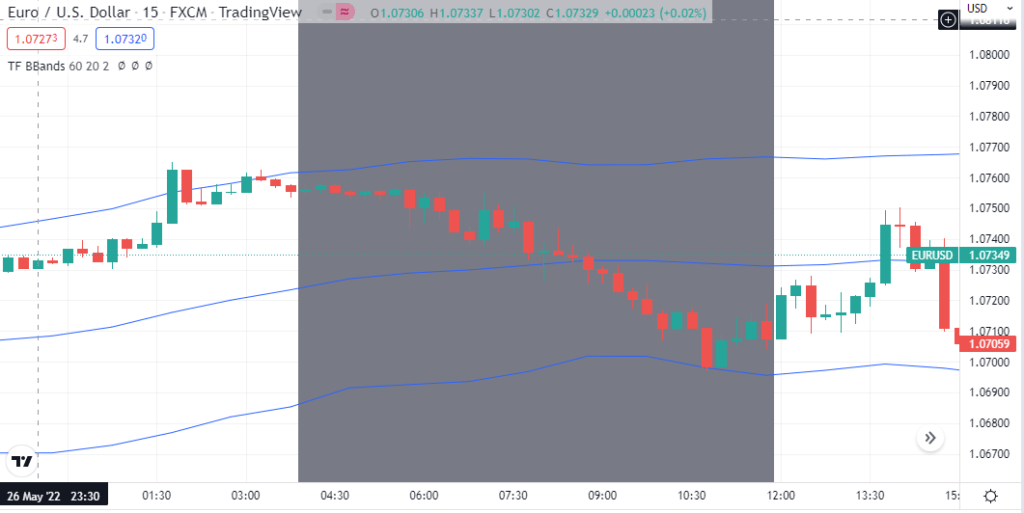
The above image is an example of the strategy. The Forex sessions indicator that we used in a previous example was used here to show when the Asian session is open.
This strategy works best in the first half of the session, after that the risk of a breakout or directional move tends to increase.
When I traded this strategy, I had to keep two charts open, a 1-minute and a 5-minute chart.
But the example above shows the 5-minute Bollinger bands drawn directly on a 1-minute chart. We will create this indicator in Pine script.
//@version=5
indicator(title="Higher TF BBands", shorttitle="TF BBands", overlay=true)
We start by declaring a name for the script and indicating it is an indicator. A shorter title can be added as well, this is the name that will be shown on the charts.
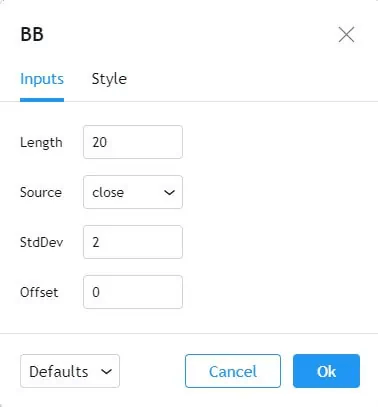
Next, we set some user inputs. We can duplicate most of the inputs from the regular Bollinger band indicator (as shown in the image above) for our custom indicator.
// Get user input
tf = input(title="BBands Timeframe", defval="5")
len = input(title="Length", defval=20)
stddev = input(title='StdDev', defval=2)
We can create the Bollinger band indicator from a built-in helper function.
[middle, upper, lower] = ta.bb(close, len, stddev)This function yields three distinct values: the lower, middle, and upper bands. Each of these values is saved to separate variables.
To compute these values on a different time frame, we can utilize the “security()” function to reference the time frame selected by the user. This time frame is stored in the “tf” variable established earlier through user input.
hbbandsMid = request.security(syminfo.tickerid, tf, middle, barmerge.gaps_on, barmerge.lookahead_off)
hbbandsUpper = request.security(syminfo.tickerid, tf, upper, barmerge.gaps_on, barmerge.lookahead_off)
hbbandsLower = request.security(syminfo.tickerid, tf, lower, barmerge.gaps_on, barmerge.lookahead_off)
The ticker symbol remains consistent, and therefore, we have employed “syminfo.tickerid,” which will retrieve the ticker currently displayed on the main chart.
With this, we’ve completed the process, and the only remaining step is to plot the newly created indicator.
plot(hbbandsMid)
plot(hbbandsUpper)
plot(hbbandsLower)
We can now observe Bollinger Bands derived from a 5-minute chart superimposed on a 1-minute chart.
The input options provide convenient customization of Bollinger Band parameters, making this indicator adaptable to various time frame combinations.
Full Code:
//@version=5
indicator(title="Higher TF BBands", shorttitle="TF BBands", overlay=true)

// Get user input
tf = input(title="BBands Timeframe", defval="60")
len = input(title="Length", defval=20)
stddev = input(title='StdDev', defval=2)

[middle, upper, lower] = ta.bb(close, len, stddev)

hbbandsMid = request.security(syminfo.tickerid, tf, middle, barmerge.gaps_on, barmerge.lookahead_off)
hbbandsUpper = request.security(syminfo.tickerid, tf, upper, barmerge.gaps_on, barmerge.lookahead_off)
hbbandsLower = request.security(syminfo.tickerid, tf, lower, barmerge.gaps_on, barmerge.lookahead_off)

plot(hbbandsMid)
plot(hbbandsUpper)
plot(hbbandsLower)
Closing Remarks
Pine Script Guide Systematic Trading
If you’ve been following the examples, you now have a good grasp of Pine Script’s capabilities.
In general, Pine Script offers a wide range of possibilities, even though it does have some limitations. Once you become familiar with it, you can swiftly code a trading strategy.
Moreover, you have the option to take that logic and implement it in another programming language if you wish to expand on it and harness third-party libraries.
The plotting functions and the ability to create custom indicators are valuable tools for both manual traders and automated systems.
Pine Script’s comprehensive strategy statistics are another significant advantage.
If you’re interested in advancing your Pine Script coding skills, TradingView provides numerous resources to help you take the next step.

Some help functions have already been discussed in this article. In addition to that, there is also a help option from within Pine editor.
Here are a few other resources –
- Quickstart Guide – This gives an example of an indicator and breaks the script down line by line.
- Pine Script v5 User Manual – A detailed manual for Pine script.
- TradingView Blog – Announcements of new features which often contain sample code
- TradingView Scripts Library – A library of open source Pine script studies and strategies.
The final option on the list serves as an excellent resource because frequently, another trader may have already coded the specific indicator or strategy you’re seeking.
Additionally, it’s a valuable resource for gathering inspiration and ideas to construct your own custom indicators or strategies.
Pine Script Guide Systematic Trading